Saturday, November 11, 2017

Is it done yet?

No, sorry, the cabin is not finished, but we did make good progress again this summer. Mother Nature provided 14" of fresh snow in our area (another 11" this weekend, according to our friend Bob) to mark the beginning of winter. Fortunately, we have enough material staged in the cabin to keep us entertained over the winter months.

This past summer the cabin exterior changed considerably as we built the deck and screen porch,  had the metal roof installed (we hired that done!), installed soffit and fascia, and finished the siding on three sides of the cabin. Wow, what a bit of wood will do to appearance!

Inside we're working on the plumbing (mostly done) and electrical rough-ins (still a ways to go). We also had spray foam insulation installed on the ceiling, gable end walls, and the rim joist (another thing we hired done!). This past weekend we hooked up the propane to the cabin and have the copper propane lines connected for the water heater and furnace; the connections are ready for the stackable dryer and range. We installed the furnace chimney and the floor furnace is operational, which will allow us to have some heat this winter during the day (we can't leave it on until we complete the wall insulation).

People are always interested in our make-shift ways of figuring things out and getting things done off the grid.  Cutting the furnace chimney hole in our brand new metal roof was another "Depends" (think adult diapers!) moment - one of these moments when you realize you have exactly one chance to get it right.  Not wanting to mess it up, we made a template for cutting the hole into our 10/12 pitched metal roof. (Hint: its not a round hole). To do this we took a section of the 5" chimney out onto the screen porch, which is also 10/12, held it vertical with a piece of cardboard on the underside of the roof. Mkay shined a flashlight up the pipe and I traced the outline. We re-traced for the 1.5" clearance then duct taped the cardboard pattern in place and cut the hole with a jig saw. Badda Bing, Badda Boom! It worked like a charm!


Family joined us for a weekend in October (Alisha, James, and Alex) so we took advantage of the extra muscle to move a "few" things into the cabin. I filled a rental truck with 800 sq ft of reclaimed barn wood flooring for the main cabin floors. Then I decided to "balance" the load with 30 sheets of 4x8 sheetrock. We also brought up the wood stove chimney parts, our Vermont Castings wood stove (which weighs over 500 pounds itself), and the Elmira range (not quite 500 pounds). If our math was close, we were near the weight limit of the rental truck at 4300 lbs but we made it without incident. Mark's Motto: A Secure Load is a Safe Load ... so we used plenty of straps to keep the load from shifting during transit. Unloading was a piece of cake with all the help (MK and I let Alex and James do most of the work!  Alisha, who happens to be eating for 2, supervised). We intentionally rented a Penske truck as they have more clearance, allowing us to back the truck up and use the ramp to make a bridge onto the deck. (Once again proving that Mark is anal retentive).

We also brought up the tile for the utility room and bathroom and the Dens Shield underlayment (goes under the tile, for those not familiar). We'll need the heat on to work on tiling so that project will need to wait for insulation.

Our son-in-law, James, must be charmed.  As we built the fire for the first night's leisure time, he wondered aloud whether we might see northern lights.  Not to disappoint, Mother Nature provided a long show of them throughout the evening.  Later this fall, we had a moose encounter as it sauntered right past our not-yet-screened porch, startling Minne, and subsequently the moose (!) who took off at high speed down to the lake.

The DIY siding jigs have worked great to allow Mark to install the 16' 2x10 siding solo. Another successful DHFDF (Do Hickey For Dumb F____) has been born!

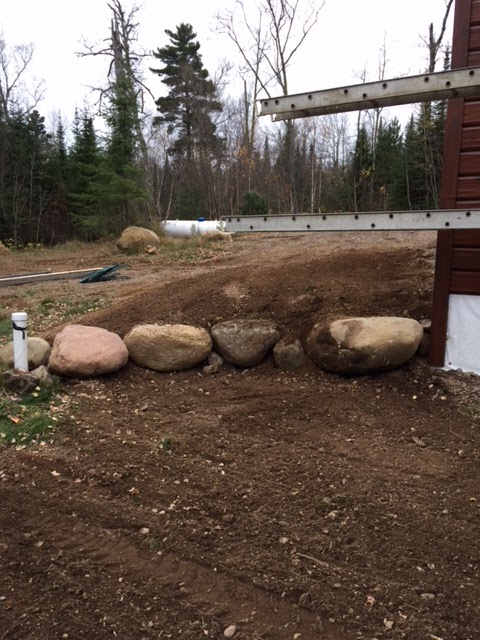
A couple more miscellaneous things we got done this summer:  With hopes of returning the bobcat to its owner this fall I built a small boulder retaining wall along the cabin to protect the septic system cleanout. We also had our trusty excavator (Brad) out to repair our mile-long driveway; unfortunately he had to pull out due to rain and we have about 1/4 mile remaining. Mother Nature won the race on removing the bobcat (think SNOW),  so we'll keep that kidnapped for another winter and return it next spring. Sorry Wayner!

Each season, we seem to have a "blooper" or two story to tell.  This fall, we found a unique way of getting the bobcat stuck (nothing better than having 6000 lbs stuck!). Trying to maneuver the bobcat in a tight spot, I wedged a 14" diameter maple tree (that is on a steep slope) between the front and rear tire (not just anyone can do that!) - thankfully, the bobcat was leaning against the tree. Trying to get it out just put me in a more precarious position. With the bobcat nearing its tip over point we (Dave and I) decided to hook a chain to the bobcat and use the truck for resistance. In order to get the truck into place we had to back up all the way around the cabin. As I backed the truck around the cabin I remembered the bobcat forks were there. No problem! I successfully cleared the forks and WHAM! managed to back the truck into another maple tree. It won the battle and took out the tail light and crunched the rear quarter panel of my truck (ok, if you've seen my truck, you might not think that's such a great loss). WAIT! We're not done yet ... we hooked up the chain to the bobcat and the truck - put the truck in 4wd low, tensioned the chain and managed to get the bobcat unstuck without issue. WAIT! The truck was revved a bit too high and literally slid sideways for 12 FEET and stopped with the pickup high centered over the picnic table!! (WHAT?) In the end, we disengaged the truck from the picnic table successfully. (I only wish we would have had a video camera on that scene, because it would have potentially won us $10,000!). Contemplating what to do next and not wanting to do any more damage, we felt it was best to sit quietly on a stump and contemplate the event.


Hope you enjoy the blog!!!!

M&M


Sunday, September 10, 2017

Roof Roof!

The delinquent Nordhjem bloggers have returned and we are alive & well! Minne, our faithful cream golden companion, is always the most excited when we head north. She's the first one in the truck when we leave city life, and always exuberant about seeing what's new when we arrive at our place in the woods.


Since our last update we've made good progress on the cabin. We finished framing the screen porch. Mkay pre-stained all the cedar 6x6 and 4x4 posts. They are so beautiful that we've altered our plans. Originally we were planning to simply staple the screen to the outside and trim with 1x4 cedar. The posts are so beautiful we cannot cover them up. Instead we will make framed screens to inset into each opening. We'll install them next spring since our bug season is over for the year.


Roof! Roof! Yes ... we now have our metal roof installed on the cabin and porch. We hired this job done. The transformation was amazing, finally removing the 2x4 roof cleats and seeing a finished roof. The color is "burnished slate" and we love how it settles into the surrounding forest. At the same time, with help from Dave, we completed the metal soffit and fascia. We took advantage of the lift from the roofing contractor, which made our work considerably easier!


We are now installing siding on the cabin! We chose a hand hewn siding from Cedar Creek. Essentially it is an expensive 2x10 that is hand hewn and has a rabbet joint between courses. We purchased the siding pre-finished to save us LOTS of time this fall, and hopefully get the siding up before winter sets in.

Again we took advantage of the lift (thanks Tom!) to install siding on the cabin gable ends. Honestly I'm not sure how we would have tackled the siding above the porch without the lift. We used the lift along with a section of extension ladder that we padded with foam and used ladder hooks over the porch roof peak to install the siding. Mark also created another DHFDF (Do Hickey For Dumb F....) jig, which helps to space the courses of siding and hold a section in place for installation. To install, we nail through the top rabbet and face screw trim head screws on the bottom of the course.


We hired out the spray foam insulation. We're building a non-ventilated roof so we applied 6" of closed cell polyurethane foam to the underside of the roof sheathing (R42) and 3" (R21 for the math impaired) in the upper gable end walls as well as the cabin rim joist and corners. Since we are on solar electrical we cannot run an air exchanger. Instead we will install batt insulation in the walls and utilize passive air exchange to control humidity and air quality. BTW ... spraying foam insulation is a NASTY job ... don't even think of this as a DIY project. Stop ... consider the source of that last statement and read it slowly ... don't even think of doing spray foam yourself.


Polly Wally Doodle! Mkay has been busy applying Helmsman polyurethane to the interior of all the windows and doors. She was not pleased when she found out her "anal retentive" husband wanted FOUR coats of poly with light sanding between coats. Truth be told Mark is such a putz with a brush that he's restricted from being within 20 feet of an open can of polyurethane.  (MK inserted comment here:  Mark CANNOT be left alone with a can of poly and a brush!)


For some reason our help felt our driveway needed a bit of repair?? It was in pretty bad shape after all the construction traffic (we'll spare you the "before" picture). We're having "pit run" trucked in and spread. If you recall our driveway is just shy of a mile long ... uff da ... the driveway is soft but it will settle over time.


We also completed the plumbing supply lines. Sounds impressive ... but there are only 4 hot and 6 cold supply lines. We used 1/2" Pex A tubing and home runned all the plumbing to the mechanical room to hot/cold manifolds, which will allow us to control water to each device. We also have the plumbing vents nearly completed. The plumbing drains remain along with the final connection to our septic. Mark continues to study the #1 rule of plumbing ... shit flows downhill ... eventually he will figure it out!

We have our electrical layout, main panel installed, electrical boxes installed, and we'll continue to pull wire when Mother Nature is not cooperating for exterior work.

Keeping with tradition here is our latest crew photo! But we blew the selfie and omitted Mkay :^(


When we are not up north we are busy preparing for the next trip or working on smaller projects. One set was fun so we made three ...


Lessons Learned:

  1. Mark cannot be left alone with a can of poly and paintbrush.
  2. If you prefer round chimney pipe do not order online.
  3. Don't even think of doing spray foam insulation yourself. Even IF you are successful you will not live long enough to enjoy the finished project!
  4. Confucius say, man who leaves with four unsecured strips of polystyrene in back of truck may arrive at destination with fewer than anticipated. 


We hope you enjoy the blog!!

M&M


Friday, June 30, 2017

Here we go again!

And so begins another year of building. We're heading up north for the week of July 4 to work on the cabin.  Just the two of us - doing odd jobs that get ready for the bigger ones to come.  We will stain the porch floor and deck; perhaps finish the porch (!); run electrical and plumbing; do some final measurements for the metal roof and siding - order the same! And whatever else mastermind Mark has in mind.

Cabin site, spring 2016
I often get asked if we'll "finish" the cabin this year. WE WISH! We estimate it to be a 3-year project, and I HOPE that's true.  Sometimes it feels daunting - like we'll never finish it. And it was really great to have a break over the winter. When I feel overwhelmed with the whole project, I look at where we were last May compared to the place we are today (see pictures at left). And I'm amazed at what we've accomplished (thanks once again to our amazing volunteer crew!). Grateful, is the only word I can come up with.

Mark's been up three times already this spring. I joined him once, over Memorial weekend. The result of those trips is the beginnings of a screen porch and deck (see pictures at the bottom).
Cabin, spring 2017

A screen porch is an absolute necessity this time of year. From  about Memorial Day through mid-July (or sometimes end of July), the black flies, mosquitos, and gnats can get pretty bad.  So, we'll be hoping for it to be a "light" year for those pests, and if not, for breezy weather! We have many ways to escape the peskies when they get to be too much...  a canoe ride (sometimes), go for a fast ride on the 4-wheeler, this year we're adding fat tire bikes to our possibilities of fun, or head down to the Big Lake and catch its cool breezes that are just too much for the bugs. Someday, I'll be able to sit in the screen porch, or in the window seat, and just watch the bugs and the world go by!

Not sure we've ever described the inside of the cabin. It's pretty simple. The porch and deck are on the west end of the cabin (you can see the stairs in the picture to the left). The east end (shown in the picture) is the bedroom, bathroom, and utility room, and of course the loft above, which will be just an open sitting/sleeping room. The rest of the cabin is kitchen and living area.  We constructed the inside walls over one weekend in the winter. Perhaps that sounds impressive, but it isn't - there are only a few walls!

And finally, a note of gratitude to all who watch this process through the blog. So many people express genuine interest in our project.  It's great to feel like there's a community of people that are interested and want to see its success. Thank you!  
Celebration after a day of decking!

Rain on the cedar decking


Porch roof on, thanks to Mark and Dave


Tuesday, January 17, 2017

Baby It's Cold Outside ...

Life in the northwoods in the winter...  some people say we're nuts!

Only by spending a weekend off the grid in the winter can you understand the true solitude that the winter season has to offer. The sights and sounds of the northwoods change as it transforms into a winter wonderland. The trees and ground are covered with pristine white snow that smothers sound and redefines the meaning of solitude and beauty. We never tire of the beauty of this corner of the world.

Most of the large animals are gone. The bears we saw multiple times last fall are now hibernating. The deer in our area push down to find food, water, and safety near lake Superior. If you are lucky enough to cross a moose path you will be amazed that they are only leaving prints and "post holing" in 4 FEET of snow. We see trails from rabbits, wolves, bobcats, pine marten, and cougar. Birds and waterfowl migrate south while others migrate to our area in the winter. We see nuthatches, grosbeaks, woodpeckers, and Canadian jays to name a few.

When we first venture into the woods in the winter, it seems really silent - as if our intrusion into the home of the animals has sent them hiding.  But as our ears stop ringing from the noise pollution of city life, the sounds start emerging out of the forest.  In the winter, these sounds are mostly the birds, who finally realize we're not an enemy, but perhaps an occasional companion. Other sounds emerge too - branches cracking, snow clumps falling from pine trees, chipmunks (or squirrels) scurrying in the treetops, Woody the woodpecker.

Do we still venture north?? Absolutely! In fact, it's one of our favorite seasons! This year, Mary Kay and I have been fortunate enough to head north on Thanksgiving and MLK weekends. Only the shell of the cabin is complete so we continue to stay in our shack, which has a wood stove and a backup LP gas heater. We enjoyed mild winter temps on both trips (in the 20s). We drove in on Thanksgiving weekend with ~8" of snow, and got another half a foot or more while we were there. This past weekend we snowshoed in 1 mile (thanks to a distant "neighbor" who keeps the road open and plows us a parking space at the end of our driveway), pulling our gear on a homemade pulk* sled. We bring our food, 6 liters of water, dog food, and extra clothes. We drill a hole in the lake for extra water for cooking & dishes.  We had bluebird skies all weekend, which is unusual in this "snowbelt" area we call our retreat.

The winter daylight hours are short but we've managed to complete the interior walls of the cabin. Yes, we do own lights but the only thing that drops faster than the sun in winter is the temperature. So when the sun sets ... It's time for happy hour, and finding ways to pass the long night in the shack (like reading, playing cards, or planning the cabin)!

In the pictures you may notice we have a total of 3 interior doors in the cabin. One 5' barn door to the bedroom and two pocket doors for the bathroom and utility closet. (This is the first time I've framed pocket doors but hey, what could go wrong?!) The barn door opens up the small cabin footprint, making the bedroom feel like part of the main living space, and of course bringing light through the cabin too. The pocket doors save precious space in that cramped corner of the cabin.

Next up: we are ready to start our electrical rough in and we have material to begin framing the porch/deck substructure. Since in the winter we haul in everything we need, we obviously brought in these supplies in the fall.

We're always learning lessons.  Here are a couple:

I learned that my cordless tools work well in the cold but the charger will not charge batteries that are either too hot, or, in our case, too cold (sounds rather like Goldylocks!). So if you are looking closely at the pictures, yes, I've gained a few pounds over the holidays, and additionally, I have a couple 20v DeWalt batteries stuffed in my jacket ... but thanks for noticing!!

Lesson #2 for this update: although incredibly expensive the board stretcher has been worth every penny we paid for it! Measure once, cut 3x, grab another 2x4 ... or something like that???

Lesson #3 - and this is for Bob:  Mary Kay says I'm anal retentive, NOT OCD.  You two figure it out!

Till next time ... Stay Warm!

M&M

*Pulk: A word that Mark knew, but MK didn't! Google definition: Pulk (from Finnish Pulkka) is a Nordic short, low-slung small toboggan used in sport or transport, pulled by a dog (named Mark) or a person, or in Lapland pulled by a reindeer. The sled can be used to carry supplies, or transport a child or other person.